I couldn't break Synology SHR+btrfs (yet)
Lately I’ve been hitting the limits of the little ARM processor and 512MB of RAM in my Synology DS218j server, so I purchased a DS1019+. This is one of Synology’s higher-end models, with five disk bays by default and support for adding more. It also includes one feature that they advertise at every opportunity… btrfs.
I’ve read a ton of bad press on btrfs and its RAID5/6 instability. For example, “Btrfs RAID 5/6 Code Found To Be Very Unsafe & Will Likely Require A Rewrite - Phoronix”, followed by “Btrfs RAID 5/6 Support Is “Mostly OK” With Linux 4.12”, but not “stable”.
Knowing all of this, I’ve been wary of using btrfs in any capacity. I was surprised to read Synology’s wholehearted endorsement of the filesystem for their RAID5 and 6 implementations, Synology Hybrid RAID I and II.
Reading Synology’s documentation, they state, “[…] it is known that Btrfs RAID is unstable and not suitable for production environments. For this reason, Synology chose Linux RAID over Btrfs RAID” (What is the RAID implementation for Btrfs File System on Synology NAS?).
By “Linux RAID”, they probably mean Device Mapper RAID, otherwise known as dmraid.
Normally, when btrfs is used on top of dm, it is unable to correct block checksum errors by itself. That’s one of the flagship features of the filesystem, allowing data which has become corrupted on disk to be repaired silently. Needless to say, I was intrigued. I decided I’d put Synology’s boasts to the test, and maybe see what makes it all tick.
The method
For this test, I needed enough disks to create a btrfs storage pool of at least SHR-I (Synology’s flexible array that can tolerate one disk failure, like RAID5) and a few test files. I can certainly handle the hard disks, I’ve got a huge box of them. How about three 320GB WD Scorpio Black laptop disks from 2011? Those are probably enough.
I started by creating an SHR-I storage pool on my laptop disks… then waited 8 hours for them to sync themselves…
While I waited, I pieced together some StackOverflow recommendations to create the laziest file creation script ever:
#!/bin/bash
# Creates 1GB files filled with binary F0 to FF, with the same names as their
# content. You end up with 16 files.

dd if=/dev/zero bs=4096 count=262144 | tr '\000' '\377' > FF
dd if=/dev/zero bs=4096 count=262144 | tr '\000' '\376' > FE
dd if=/dev/zero bs=4096 count=262144 | tr '\000' '\375' > FD
dd if=/dev/zero bs=4096 count=262144 | tr '\000' '\374' > FC
dd if=/dev/zero bs=4096 count=262144 | tr '\000' '\373' > FB
dd if=/dev/zero bs=4096 count=262144 | tr '\000' '\372' > FA
dd if=/dev/zero bs=4096 count=262144 | tr '\000' '\371' > F9
dd if=/dev/zero bs=4096 count=262144 | tr '\000' '\370' > F8
dd if=/dev/zero bs=4096 count=262144 | tr '\000' '\367' > F7
dd if=/dev/zero bs=4096 count=262144 | tr '\000' '\366' > F6
dd if=/dev/zero bs=4096 count=262144 | tr '\000' '\365' > F5
dd if=/dev/zero bs=4096 count=262144 | tr '\000' '\364' > F4
dd if=/dev/zero bs=4096 count=262144 | tr '\000' '\364' > F3
dd if=/dev/zero bs=4096 count=262144 | tr '\000' '\363' > F3
dd if=/dev/zero bs=4096 count=262144 | tr '\000' '\362' > F2
dd if=/dev/zero bs=4096 count=262144 | tr '\000' '\361' > F1
dd if=/dev/zero bs=4096 count=262144 | tr '\000' '\360' > F0
I know some of you are screaming at your monitor right now, but it worked. The script created sixteen 1-gibibyte files as fast as my disk could write them. Each of them was filled with a binary pattern matching their name:
ls files/
F0  F1  F2  F3  F4  F5  F6  F7  F8  F9  FA  FB  FC  FD  FE  FF
Using these “predictable” files as my test subjects, I’d be able to find them on the disk more easily. When I knew where the files were located, I could corrupt them.
I copied the files over to the server, in the appropriately named lol folder. Then, I safely powered down the DiskStation and moved the disks from it into my desktop running Ubuntu MATE 19.10 for some investigation.
SHR-I+btrfs: a clean layout
My desktop saw the disks with no problem.

Here we see that there are three RAID member partitions on each disk. One is inside of an extended partition, which is fairly standard for an MBR partitioning scheme (you can have three primary partitions and one extended, which can contain more partitions). There is some buffer space between the first two members and the extended partition, and there is buffer space at the beginning and end of the extended partition.
It’s important to note here that Synology’s Disk Station Manager (DSM) operating system which runs on these servers is a Linux distribution. Synology uses this to their advantage, using a number of standard Linux tools, including Device Mapper RAID rather than btrfs RAID.
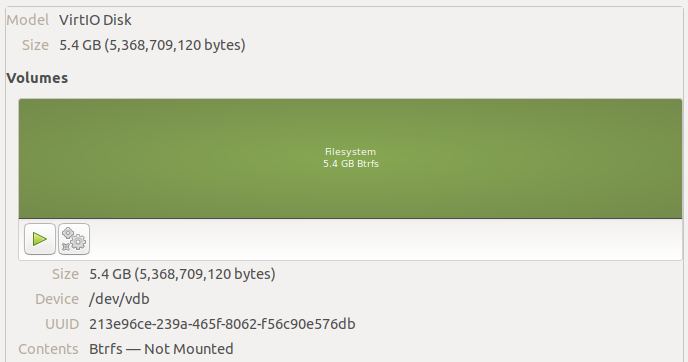
If Synology was using btrfs RAID, we’d see a btrfs volume on all these disks. For an example of this, I created a VM and made a btrfs volume across three 5GB disks:
Additionally, the two RAID volumes at the start of each disk appear to contain the DSM software. Both of these partitions are mirrored on every disk you initialize in the system. That’s why you need a disk to even install a base operating system on these servers, and why all of your disks are wiped immediately upon installation. However, it allows you to take all but one initialized disk out of the DiskStation but still boot the system with most of your settings.
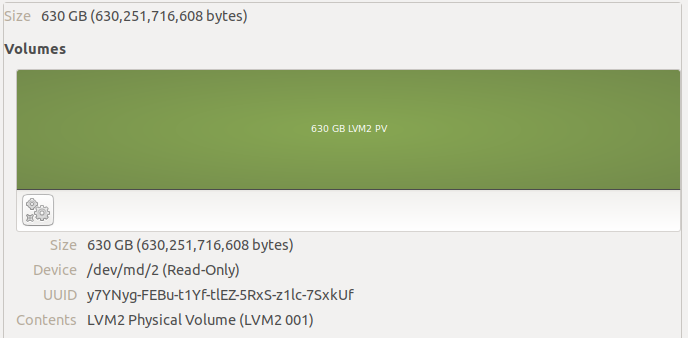
On top of the largest partition across all three disks, we find an LVM2 Physical Volume. This is how Synology handles quickly growing the array, it seems.
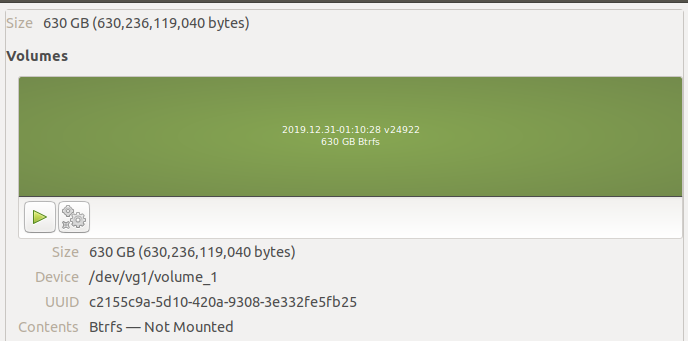
I was able to see the logical volumes inside this physical volume by running sudo vgchange -ay vg1… there’s our btrfs volume!
Mounting the volume, we can see all the data inside.

The folders starting with @ are internal to DSM. They contain databases and file attributes that the OS keeps in addition to the filesystem metadata.
While messing with all of this, I realized how slow it was going to be to scrub this pool every time I corrupted a file. Instead of continuing with these 320GB disks, I found a couple of 80GB SATA desktop disks and a 64GB SSD in storage, slotted them into the server, and built a pool.
Now I knew how Synology avoided using btrfs RAID, but that left an interesting question – how does Synology handle checksumming and repair of files if not by allowing btrfs to manage RAID?
Investigating SYNO_BTRFS
On one hand, I know that btrfs is open source under the GPLv2 license, like the rest of the Linux kernel. On the other hand, both Synology and QNAP are very protective of their secret sauce. In this case, butter sauce. Laugh track.
There is a Linux device-mapper module that can detect integrity problems, dm-integrity. However, it was not merged into Linux until 4.12, whereas my Synology runs 4.4:
$ uname -a
Linux ds1019 4.4.59+ #24922 SMP PREEMPT Fri May 10 02:59:42 CST 2019 x86_64 GNU/Linux synology_apollolake_1019+
Unless they’ve backported dm-integrity, that’s not it. Looking at the ‘backports’ .tgz file from Synology Open Source Project 22259 branch (which is from October 2017, lame), there’s nothing terribly interesting in there. Just a Realtek driver for 4.4.
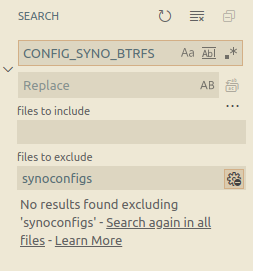
However, looking around the ’linux’ archive, I saw that they’re doing a LOT of work on btrfs. In the synoconfigs/apollolake file:
CONFIG_SYNO_BTRFS_PORTING=y
CONFIG_SYNO_BTRFS_STAT=y
CONFIG_SYNO_BTRFS_XATTR=y
[...]
This continues on for 59 lines. It appears that Synology is either backporting fixes or performing fixes themselves. It appears that they’re sending some patches to btrfs upstream as well. At least, ‘synology’ is mentioned with some frequency on the maintainer mailing lists. You can see this by searching “synology btrfs site:lkml.org” on DuckDuckGo.
One option in particular, CONFIG_SYNO_BTRFS_CHECK_INTEGRITY=y, seemed rather interesting. I scratched around a bit more in the source to figure out what was going on there. Unfortunately, I came up empty. There are no #ifdef blocks for any SYNO_BTRFS configs. That’s a shame.
At the very least, if you see anyone saying that Synology’s OS is open source, see if they can find the source for these configuration options. Then, point me to them so that I can edit this post! It appears Synology is building btrfs as a module, at least, so maybe they’ll use the excuse that the module is shipped independently of the kernel and therefore isn’t covered under the GPL…
Someone has already reached out offering to get in contact with some kernel maintainers about the topic. I hope we can see something amazing out of it. If you’re thinking about contacting Synology support right now with fire in your words, please don’t. We all benefit more, and have more productive conversations with vendors, if we remain civil and let the people with experience in these matters handle it. The support personnel probably can’t help anyway.
While in Synology’s provided source, I found a number of other annoyances… like #ifdef MY_ABC_HERE. It’s actually used in quite a lot of places. I’ve found some other instances of people running into these, such as MY_ABC_HERE and MY_DEF_HERE on the XPEnology forums. Maybe just a lazy way to comment out or disable things?

While I was researching all of this, my resync completed. It was time to corrupt some data!
Let’s corrupt some stuff!
With my new array ready, I copied over my predictable files and got to work. For each test, I safely powered off the DiskStation to remove a disk unless otherwise stated.
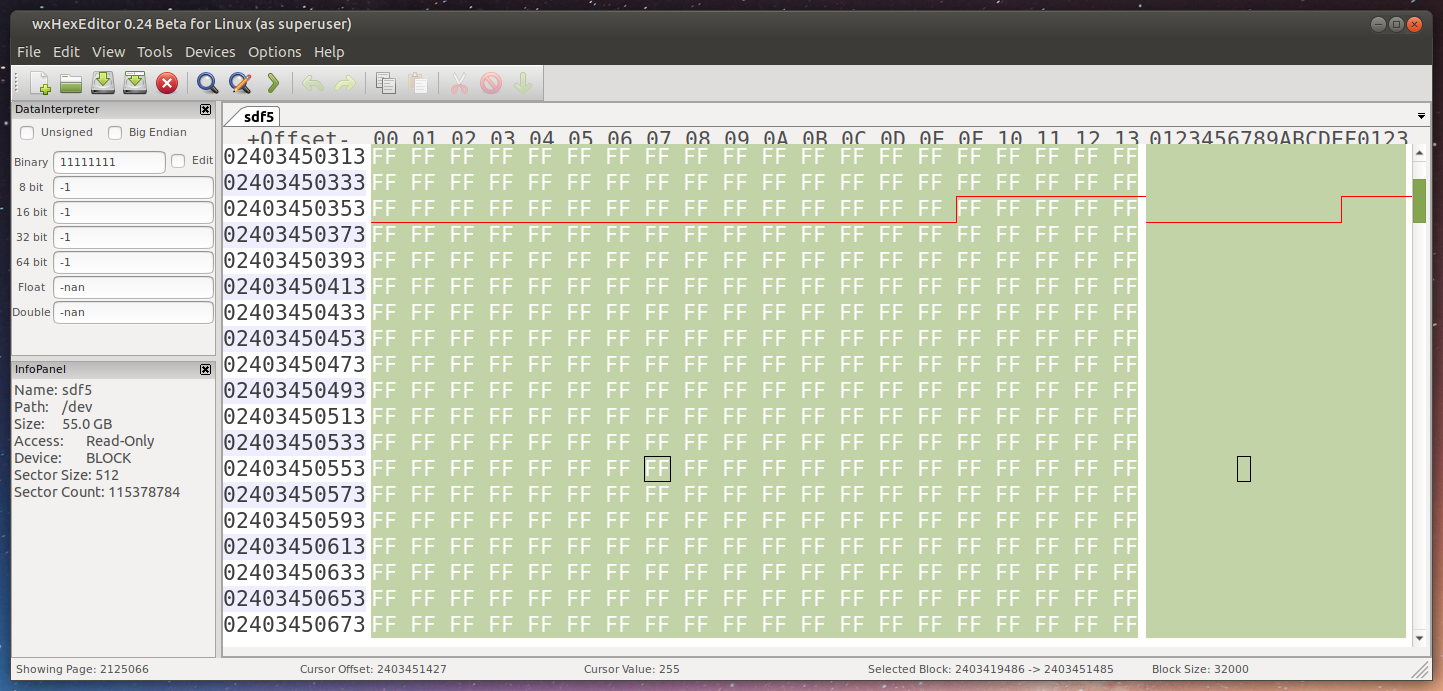
For the purpose of corrupting things, I removed the 64GB SSD from the server and plugged it into my desktop. I booted up wxHexEditor to do my dirty work (sudo apt install wxhexeditor, it’s pretty fun!).
Using wxHexEditor’s search feature, I tried to find a stripe of contiguous bits containing FF. Wherever that pattern was found was where the file named “FF” was located. The search failed.
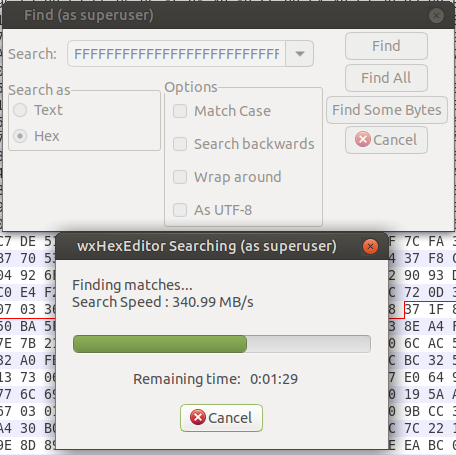
I was a bit surprised, but took the opportunity to create an image of the disk. That way I had the original data which I could mess with all I wanted, and at a couple gigabytes per second rather than 300 megabytes per second.
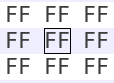
Turns out I didn’t need to take the image or even do the search to begin with, it was easier to just scrub through the disk until I saw a screen full of F. That’s the content of the FF file!
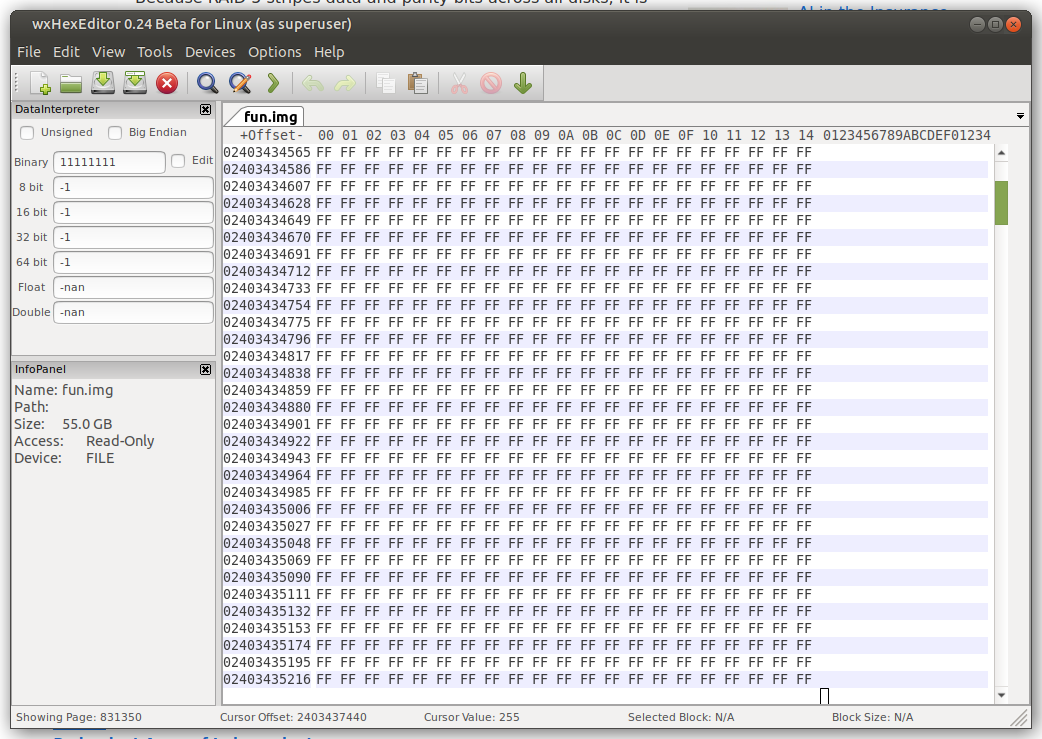
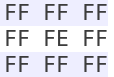
To flip a bit, I changed an 0xFF to an 0xFE. Since we’re talking in hexidecimal, that changes a 11111111 to 11111110. Corrupted!
Then I put the disk back into the server and powered it up. Once the server was ready, I started copying the “FF” file from it to my desktop. I expected a report that disk corruption had occurred, but the copied file should have matched the original checksum.
During the operation, I noticed that it stopped for a moment. Maybe a retried read, maybe it corrected the file? Either way, the checksum of the server’s file and the original matched.
$ sha256sum FF
71cc8c3a8d6f83a8290ed7608f24c768b4361a24cb73b18a554ebba4c7c99c1e  FF
$ sha256sum ../FF
71cc8c3a8d6f83a8290ed7608f24c768b4361a24cb73b18a554ebba4c7c99c1e  ../FF
Cool! I just corrupted a file, yet it was corrected without any intervention!
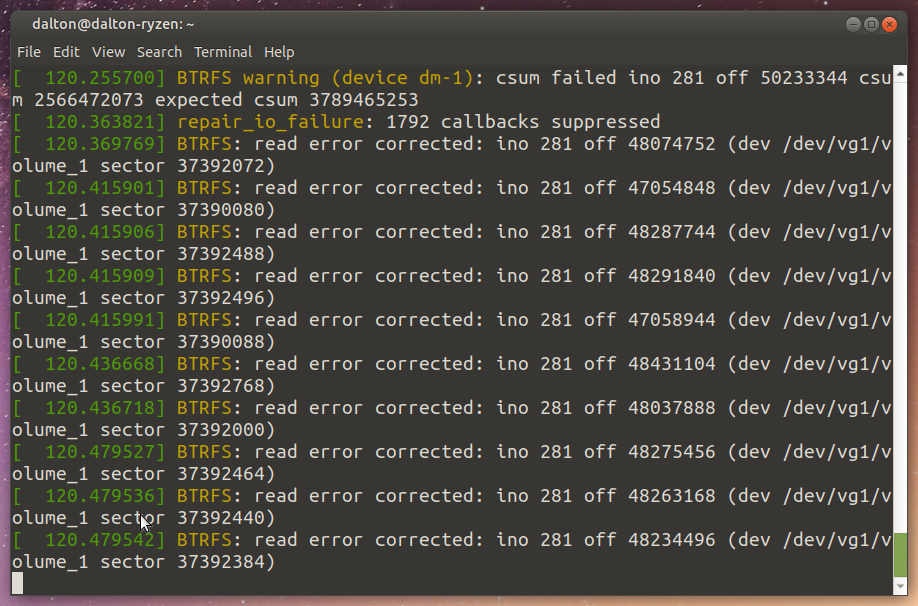
When I looked in the server’s kernel log (dmesg), I saw that the checksum error was detected, then corrected automatically:
[   78.120453] BTRFS warning (device dm-1): csum failed ino 274 off 55463936 csum 2809655204 expected csum 633470483
[   78.136461] BTRFS warning (device dm-1): csum failed ino 274 off 55463936 csum 2809655204 expected csum 633470483
[   78.185519] BTRFS: read error corrected: ino 274 off 55463936 (dev /dev/vg1/volume_1 sector 9358528)
When I plugged the disk I corrupted back into my desktop and look at the bit I corrupted, it was put back to the way it started.
Somehow the server corrected the file, even though it was using btrfs on top of LVM. I suppose that’s a Synology exclusive.
Now what if I did something more crazy, like zero a block of this file?
Corrupting 32K
I selected 32000 bytes and changed them all to 0x00, or 00000000.
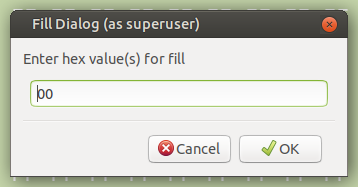

Again, the read errors were detected and corrected. Like nothing even happened.
To no one’s surprise, btrfs can detect and correct single or multi-bit errors on a single disk. Color me impressed. Let’s go a little further.
Corrupting most of a file
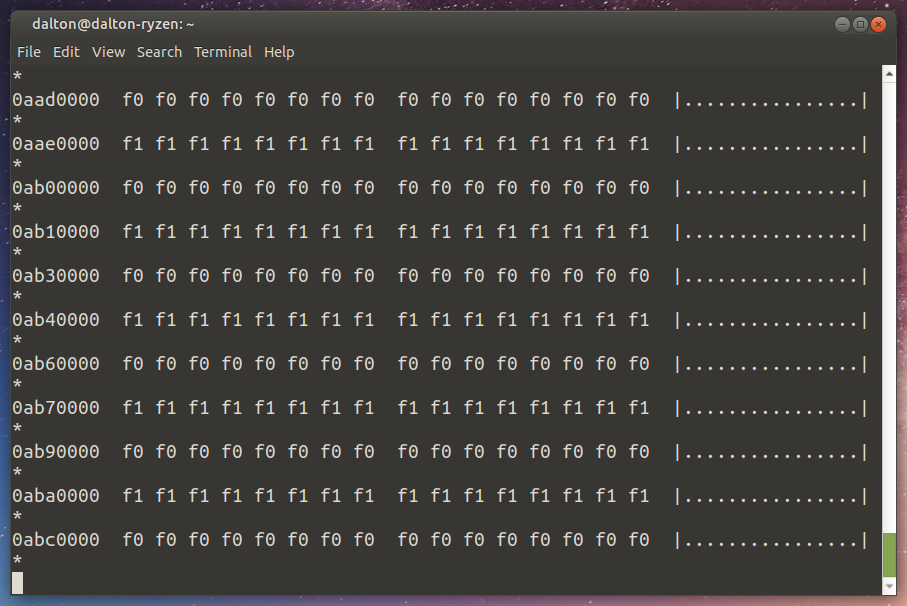
Next I wiped most of a file from one disk. I used the “F0” file for this one, since I noticed it came first on the disk. Easier to find.
To do this, I used hexdump on the disk image along with grep to find all of the contiguous instances of f0f0:
$ hexdump fun.img |grep 'f0f0 f0f0 f0f0 f0f0 f0f0 f0f0 f0f0 f0f0'
11950000 f0f0 f0f0 f0f0 f0f0 f0f0 f0f0 f0f0 f0f0
11980000 f0f0 f0f0 f0f0 f0f0 f0f0 f0f0 f0f0 f0f0
119b0000 f0f0 f0f0 f0f0 f0f0 f0f0 f0f0 f0f0 f0f0
119e0000 f0f0 f0f0 f0f0 f0f0 f0f0 f0f0 f0f0 f0f0
[...]
This continued for a while.
I took the entire region the file was found in (it was interspersed with 0’s and other files, that’s why hexdump’s output was multiple lines) and zeroed it. Back in the server, and now you know the drill.
$ sha256sum F0 ../F0
73cf58254515ac10682ca5b4efdeb7fdf3849fcea2fd4130cf90e81b66071707  F0
73cf58254515ac10682ca5b4efdeb7fdf3849fcea2fd4130cf90e81b66071707  ../F0
Honestly this was getting a little boring.
Corrupting the file on two disks
Now I tried to corrupt one file on two disks. And, instead of zeroing it, I flipped some bits instead, changing F0 to F1 (...1111 0000 1111 0000... to ...1111 0001 1111 0001...). Since nothing else broke the server up to this point, I had to do something to cause errors.
Corrupt file (twice!), put disks back in server, turn on server, copy file to desktop. This time, the copy operation was really slow. I checked the kernel log again:
[  675.103420] BTRFS error (device dm-1): failed to repair data csum of ino 259 off 248094720 (ran out of all copies)
[  675.104042] md/raid:md2: syno_raid5_self_heal_retry_read(7665): No suitable device for self healing retry read at sector 1632576 (leng:8, retry: 2/2, request_cnt:3)
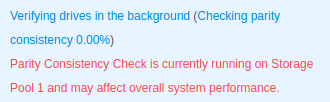
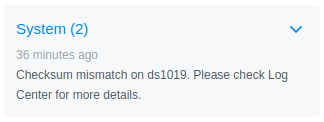
That’s not what you want to see. Immediately, a notification appeared in DSM alerting me to a checksum mismatch:
However, the file was still copying somehow, running at about 500 kilobytes per second. Confused, I ran tail -f F0 |hexdump -C to see the file as it was being written out:
That, my friends, was a very corrupt file. Some data appeared to be coming from the stripes of the file that I did not clear, but generally this would render your data unusable. Remember, the file is supposed to be filled with f0 f0 f0 f0... and so on.
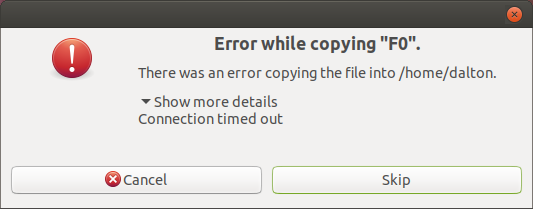
Finally, after copying 590MiB of 1GiB, the copy operation died with a timeout:
After all of this, I ran a manual scrub on the disk to make sure I cleaned up any outlying lost files and – what’s this?
Another one? I checked the logs, like it suggested:
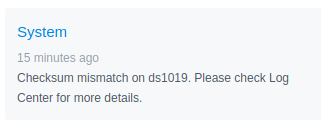
Warning - Checksum mismatch on file [/volume1/@database/pgsql/base/16385/11687_vm].
Then I checked the kernel log again:
[ 2530.712167] failed to repair csum (scrub) at logical 18369212416 on dev /dev/vg1/volume_1, mirror = 0, metadata = 0
[ 2530.712392] BTRFS warning (device dm-1): (null) at logical 18369212416 on dev /dev/vg1/volume_1, sector 36680184, root 257, inode 1567, offset 12288, length 4096, links 1 (path: @database/pgsql/base/16385/11598)
It seems like I corrupted this file during this test as well, but didn’t notice it until the scrub. It’s a fun example, since the file was located inside a hidden folder. I’m still not sure how I could back up the file for restoring in a situation like this. I left it corrupted to see what DSM did about it.
Pushing on, I deleted all of my predictable files and placed fresh copies on the server. After copying them back to my desktop, they appeared to be the same. Even if you completely trash the volume, it doesn’t need to be re-created in order to recover… only the data needs to be recovered. That said, if a volume started throwing that many errors, I would not continue using it. It’s too bad the Synology-modified btrfs can’t tell me which disk is actually causing all these problems. Checksum problems are silently corrected instead. After a couple of those I’d really like to know that my disk is returning unexpected data!
This test was really quite ridiculous, it is known that you can only lose data on a single disk with SHR-I. Still, I wanted to see if the volume would continue working even under harsh conditions. To keep that theme going, I kept this volume throughout the rest of these tests rather than recreating it.
It was time to torture whole disks in the array rather than parts of disks.
Rebuild torture
The bespoke recovery mode of a RAID5 implementation – SHR-I in this case – is losing a single disk but being able to rebuild given the other disks are intact. This should be true even under harsh conditions, like power failing unexpectedly. Additionally btrfs should be able to handle a disk forgetting most of its data instead of failing outright. This is a feature exclusive to the checksumming filesystem (and its nearest cousin, ZFS, of course).
Wipe most of the RAID partition
To start, I found the start of the first predictable file I saw on the SHR-I member partition (the one inside the extended partition earlier). I wrote zeroes from this position to the end of the partition. No doubt this deleted file data, parity data, and probably some important filesystem structures too.
# dd if=/dev/zero of=/dev/sdg5 bs=512 seek=2905657
That wiped about 45GiB of data. Enough to keep the LVM and btrfs headers but remove almost everything else.
The DiskStation booted without any problems and did not signal a volume degredation. Let’s try to copy some files from the server:
Again, unsurprising. A lot of warnings, the copy is going pretty slow (8MBps rather than 78), but the files all match as expected. A further scrub ran slowly but seemed to put the data back into place as expected.
Now what would happen if I wrote a disk, but with a twist?
Wipe a disk, power off during rebuild
For this test I powered off the DiskStation, removed a disk, completely wiped it, then returned it to the DiskStation.
When the server booted with the wiped disk, it alerted me to a degraded array with rather annoying beeping. Then it offered the wiped disk as a suitable replacement for the “failed” one.
While the rebuild was in progress, I pulled the power on the server a total of six times. Each time it booted back up and resumed the rebuild operation.
Unsurprisingly, the rebuild succeeded, all the files matched their starting checksums, and a scrub after the resync found no new problems. The corrupted file from before was still corrupted.
Pulling the plug inspired me to run even more power loss tests, now while writing new data.
Power loss during write
To check what happens on a power loss during a write operation, I needed a ton of small files. Copying small files to the disk writes both metadata and file data in quick succession, making it more likely that metadata is corrupted on power loss. Let’s make a small file with dd then copy it a bunch of times using the file manager (because I’m too lazy to create them all by hand).
dd if=/dev/urandom of=4Kfile bs=4096 count=1
Just like that, a 4 kilobyte file. Copy that a good 3000 times and I had an excellent recipe for messing up our array. I started copying all of the small files to the server, then disconnected the power from the server in the middle of the operation.
As soon as the device booted back up, I was greeted with three DSM notifications.

Looks like Synology forces a data scrub on every unclean shutdown. That’ll be expensive to performance, but good for system integrity. But what was that checksum error?
Warning - Checksum mismatch on file [/volume1/@database/pgsql/base/16385/11687_vm].
Great, that file is still corrupted. At least DSM is still working normally.
I checked if any of the files I was copying were written to the volume:
Guess not. No files here. That wasn’t totally unexpected, it was likely that the server was holding the files in a RAM write cache.
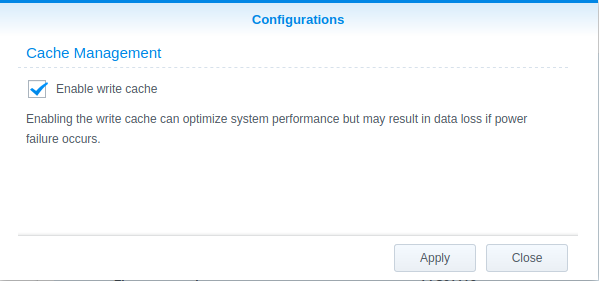
Sure enough, each disk has its own write cache option in DSM. I turned that off and tried to copy the files again after the forced scrub finished. One power fault later…

Guess I broke a mirror of the system files doing that. Don’t worry though, all the disks are fine. I hit “Repair” and the system synchronized the system partitions again.
After that was done, I checked the shared folder. Blast! No files. One more time, then I was going to use larger files. I let the copy operation from my PC to the server succeed this time, then pulled the plug on the server.
I checked the shared folder after the server rebooted to… success! I had over 3000 small files locally but the server reported 2488, meaning the write was interrupted before it all got to disk. A further scrub revealed no issues, and all the files that were written successfully were identical.
This is basically an expected result of interrupting a copy operation… the files which weren’t written to disk just weren’t available.
Power loss during scrub
This time I created a lot of 2MB files, started a scrub operation on the array, started copying the files, then cut power to the system. Again, DSM automatically started a new scrub and I received the “System Partition Failed” error. Worse than that, the files I was trying to write weren’t even on the disk. Lame.
# Create ~2MB file
$ dd if=/dev/urandom of=2MBfile bs=4096 count=1000
Another try, this time I waited for the files to start showing up in the File Station app on the server. After a reboot, there were files in the shared folder! Some of them were zero bytes large, one was half its normal size, and all the rest were perfect. Still not terribly interesting. Pretty expected results of losing power during an SMB copy operation.
The volume seemed fairly resilient to power loss during rebuild, scrubbing, and writing. There was one glaring issue that I still needed to test, though.
Write-hole
The btrfs write-hole is defined on the raid56 page on the btrfs wiki:
[A] partial write as a result of a power failure will result in inconsistent parity data. […] The problem [is] born when after “an unclean shutdown” a disk failure happens. But these are two distinct failures. These together break the BTRFS raid5 redundancy.
Basically, if you don’t scrub between a power loss and a disk failure, you’re at risk of losing your whole volume. This should not affect SHR-I since btrfs RAID is not in use at all.
All I needed to do to test this was cause a power failure during the write operation, simulate a disk replacement by wiping one disk, then boot everything back up and repair the volume using the wiped disk. If the rebuild completed and I could still retrieve my file, the write-hole issue wasn’t so glaring.
I copied my 2MB files from before to a USB hard disk. This allowed me to copy the files to the server without the SMB overhead, so hopefully I could shut off the system in the middle of a write operation more easily.
You know how it works now: boot the server, copy files, unplug in the middle of the operation while all the disk activity lights are blinking. Except this time, I also removed disk 1 and reformatted it before booting the system.
I repeated this process twice. Both times, the server came up and alerted me to a disk failure. I allowed it to rebuild the array with the disk I wiped, which completed normally. I ended up with a single 0-byte file after a few hundred identical copies of the 2MB file. No filesystem armageddon here, just a copy error.
No sweat.
Honestly, I expected smoke out of this whole operation. I expected some hard btrfs errors. I thought I’d have to learn about the filesystem structure so I could repair the btree, get the disks back into a degraded state, and bring the array back online… but no such luck. It’s for the best, really.
This exercise leaves me much more confident in Synology’s software, especially seeing that I could simply plug all the disks into my desktop and mount the array. Being able to take my data elsewhere has been a recurring theme throughout my experience with Synology. For example, I heavily use the Synology Moments software for my family. I put the app on everyone’s phones and their photos are automatically backed up… just like Google Photos. Also like Google Photos, the Moments software automatically tags items in the photo using machine vision. These tags are saved in the Exif and XMP data on the photo. I can download my entire photo collection from the server and move to a different photo management software but not lose those tags. Big features like that, which actively prevent lock-in, really impress me.
That’s why I decided to give Synology my money a second time instead of building my own server. If anything happens to Synology, I can still build my own server. Until then, I’m going with this convenience. Doubly so now that I know my data is protected from silent corruption, extremely faulty disks, extremely faulty power, or all three at once.
I am still disappointed that I wasn’t able to find the source code for Synology’s btrfs implementation. It would be amazing to use all of the btrfs features in RAID5/6 on ANY Linux system without worrying about the write-hole.
So, this is where I’ll leave this testing for now… it’s almost time to put this DS1019+ into production. If you have any comments on this testing or just want to chat, you can find me on Twitter @UnivrsalSuprBox, @UniversalSuperBox on Telegram, or @UniversalSuperBox:matrix.org if you’re hip and on Matrix.
I’ve already received suggestions on how to up the ante on breaking SHR+BTRFS with more ridiculous tests and research, but in order to do that I’ll need time, another DiskStation, and some more SSDs. If you want to see me flounder around trying to find the checksum metadata or wrestling with the dual parity stripe of SHR-II, hit me up at any of the places mentioned above with hardware in hand.
Thanks for reading, and happy new decade!