Installing Ubuntu 4.10 from USB on a Year 2000 Power Macintosh G4
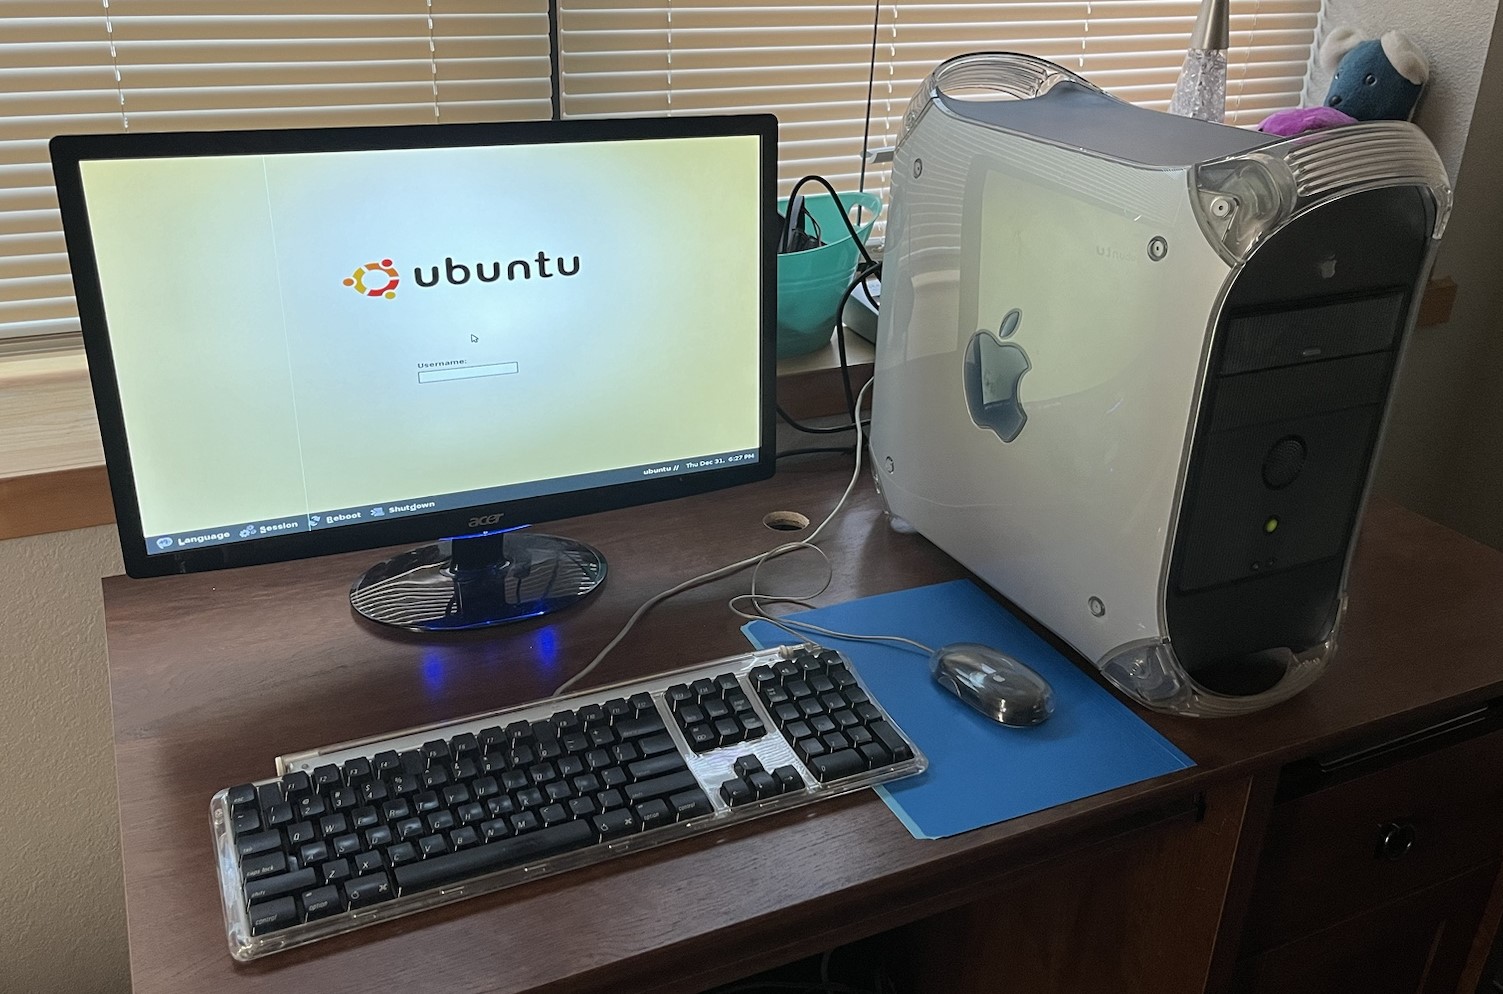
The Power Macintosh G4. There are many like it, but this one is mine. It also runs Ubuntu 4.10.
This is the story of how I got this 20-year-old software running on a 24-year-old PowerPC monster.
The challenge
I co-host a Linux-themed podcast, Linux After Dark. We set ourselves a challenge: try out the first Ubuntu release, 4.10, and compare it to our favorite distributions in 2024. We considered it a bonus if we used 4.10 on period-correct hardware. I won’t expand on that any further, we did a great job in our episode on the topic.
The only period-adjacent hardware I own is the Apple Power Macintosh G4/400 (AGP). You can find out more about this machine as shipped on Everymac’s specs page for it. My model is the cost-reduced version of its class, shipping with 64MB of PC100 SDRAM, a 400MHz PowerPC 7400 processor, a 10GB Ultra ATA/66 hard drive, a DVD-ROM drive, and an ATI Rage 128 Pro. It retailed for $1599 in January 2000, about $2900 adjusted for inflation in January 2024[1]. I’ve installed about 500MB of RAM and a generic CompactFlash card adapter into which I’ve installed a 32GB SanDisk Extreme card (which failed shortly after this experiment was finished). I’d love to install Ubuntu to the device’s internal hard drive to see how it really performed back in the day, but Apple’s branded Quantum Fireball whines so loudly it triggers my migraines.
Normally, you’d get software onto a Mac this old using its DVD-ROM drive. However, I don’t currently own any blank writable CD or DVD media. I’m also stubborn and don’t want to buy any. And, I told myself, if I got another installation method to work, it’ll be possible to get software on this device long after its mechanical parts have failed. So I went on a journey to install Ubuntu 4.10 on this old hardware without creating a plastic coaster.
This turned out to be quite an endeavor, one that couldn’t fully be discussed on voice. I wanted to take you through the process in case you want to do this yourself or apply the concepts to get some other software booting on an OpenFirmware PowerPC Mac.
You’ll have to apologize for my lack of screenshots, I don’t have any capture device, especially not one that works with DVI or VGA video. You wouldn’t like me taking pictures of the screen.
The first attempt
Doing a bit of research, I found that this Mac is capable of booting via either of its USB ports (yay!), but they are both USB 1.1 Full Speed (12Megabits per second) so it’s going to take a while to install. On the bright side, both of the ports on the rear have dedicated busses, so we have that going for us.
I downloaded the Ubuntu 4.10 PowerPC ISO[2] and wrote it to a USB drive (it happens to be a USB 3.0 SD card reader) with Rufus on my Windows 11 PC. Rufus commented that the drive must be written in dd image mode since it was not a proper hybrid ISO. I plugged my period-appropriate keyboard and mouse into USB port 2 on the rear of the Mac, plugged my boot disk into USB port 1, and powered it up while holding the Option key on the keyboard. The boot picker appeared. After the menu finally let me operate it, I selected the USB drive (which had a helpful Tux icon on it) and clicked the “Continue” button. I was dropped into a shell-looking prompt[3]:
Apple PowerMac3,1 2.6f1 BootROM built on 05/16/00 at 10:13:21
Copyright 1994-2000 Apple Computer, Inc.
All Rights Reserved.

Welcome to Open Firmware.
To continue booting, type "mac-boot" and press return.
To shut down, type "shut-down" and press return.

 ok
0 >
Hmm. Unfortunately, it seemed it wasn’t possible to boot this USB drive from the boot picker. Reading the “Booting the Installer on PowerPC” section of the 4.10 installation manual, this was probably a common problem. To keep it short, I read through a bunch of documentation to figure out that the command I needed to boot the USB drive. For more about my learnings, check out my other post Crash Course in Ancient Open Firmware. With all that out of the way, I get to say that I typed:
boot usb1/@1:2,\\yaboot
And after a little while, the computer happily cleared its screen to black and came back with a new prompt:
Can't open device <cd:0>
cd:2,/install/boot.msg: Unable to open file, Invalid device
Welcome to yaboot version 1.3.13
Enter "help" to get some basic usage information

WARNING: Bootstrap partition type is wrong: "Apple_HFS"
         Type should be "Apple_Bootstrap"

boot:
I thought I was in business, so I hit Enter:
boot:
Please wait, loading kernel...
Can't open device <cd:0>
cd:2,/install/powerpc/vmlinux: Unable to open file, Invalid device.
Shoot. This installation ISO couldn’t boot from USB.
I tried to manually boot the vmlinux file by typing usb1/@1:2,\install\powerpc\vmlinux. The kernel booted successfully! However, it failed to mount its root partition. This was because the yaboot bootloader failed to provide it an initramfs or an appropriate root= argument. I opened up the Ubuntu ISO and read the /install/yaboot.conf file to try and figure out how to work it. I tried typing initrd=usb1/@1:2,\install\powerpc\initrd.gz to get it loaded, but yaboot simply loaded the kernel and booted it to failure. After some research, I found that this version of Yaboot can’t have the initrd argument specified at the command line, only via the config file. Additionally, since the config file specified device=cd, I couldn’t change which device yaboot was using for the initrd.
It sounded like I needed to modify the config file, then. But how, given this was an ISO?
Respinning the ISO
Through trial and error, I found that the CD would work perfectly if only the device=cd line was deleted from the config file[4]!
There were a few false starts here which led to days of troubleshooting. The first time I unpacked the ISO, I failed to realize that my Linux PC had mounted the ISO9660 filesystem without any filesystem extensions. This caused a bunch of files to be unusable by debian-installer since their paths were truncated at something around 70 characters. I had regenerated the md5sum.txt file, too, so there was no way for the installer to find my failure. I read through ancient debian-installer source and typed commands on its tiny Busybox console for hours before figuring that out. Don’t be like me. Follow these instructions.
These steps must be performed on a Linux host (WSL works too). Install xorriso from your distribution’s repositories to get the software you need to unpack and repack the ISO. If the genisoimage command is not included with your xorriso package, also install genisoimage (they come from the same package in Fedora, different packages in Debian and Ubuntu).
First, get yourself a directory to work in. Copy the warty-release-install-powerpc.iso and mini.iso into the directory. Perform these steps on a native Linux filesystem.
Next, Run the following command to correctly unpack the ISO:
osirrox -hfsplus on -rockridge on -indev warty-release-install-powerpc.iso -extract / extracted/
The directory extracted/ will appear in your current directory. To ensure the extraction completed successfully, check the file extracted/pool/main/a/archive-copier/archive-copier_0.0.9_powerpc.udeb. If it’s there, you’ve got a good extraction! If it’s called archive-copier_0.0.9_powerpc.ud or some other short name, the extraction is invalid.
Make the install directory editable so you can modify the yaboot.conf file (and so sed can write its temporary file for inplace replacing):
chmod u+w extracted/install/ extracted/install/yaboot.conf
Then, modify the config file to disable the CD boot:
sed -i 's/device=cd:/# device=cd (disabled for USB installation)/' extracted/install/yaboot.conf
We also need to update the md5sums file with the new checksum for the config file in case anyone wants to check the media integrity:
chmod u+w extracted/ extracted/md5sum.txt
(
    cd extracted
    checksum="$(md5sum ./install/yaboot.conf)"
    sed -i "s|.*install/yaboot.conf|$checksum|" ./md5sum.txt
)
Now we can spin a new ISO. There’s probably a way to do it with the osirrox command line, but I figured out genisoimage first:
genisoimage -hfs -r -part -o warty-usbenabled-install-powerpc.iso ./extracted
Write your new warty-usbenabled-install-powerpc.iso to your USB drive and plug it into your Mac. Booting from this device works almost like it did last time, but we need to specify the \install folder now[5]:
0 > boot usb1/@1:2,\install\yaboot
Installing Ubuntu
There are two problems installing Ubuntu.
- The CD does not have its release codename coded correctly so it fails to find a Release file. We need to use the network to download the installation contents. Yes, this means we’re using the full installation media as a glorified
mini.iso. - The CD won’t auto-mount.
To overcome these issues, plug your Powermac into Ethernet and follow along with the instructions.
At boot time
After you boot from your USB media, type custom-powerpc at yaboot’s boot prompt. This will allow you to select an Ubuntu mirror and codename later.
CD-ROM mounting
When you get to the Your installation CD-ROM couldn't be mounted error, switch to the VT by pressing Control+Alt+F2, then mount your USB device on /cdrom. My USB device shows up as “USB Attached SCSI” to this old Linux kernel, so I ran the following command. Your mileage may vary on where your USB disk shows up (especially if you have a SCSI card that takes bus0), so look around /dev until you can locate it. Reading the kernel message log with dmesg | more may also be helpful for identifying where it is.
mount /dev/scsi/host0/bus0/target0/lun0/disc /cdrom
Once the filesystem is mounted, go back to the installation by pressing Control+Alt+F1. Select “No” on the question which asks whether you’d like to try the mount process again. Select “Continue” on the next two scary red error screens. Then select “Detect and mount CD-ROM” on the menu to get the installation moving again.
Load installer components from CD
At the step which asks you which components to load, select choose-mirror and continue. This will introduce a new step to the installation which, crucially, allows you to select the suite name warty for this installation. When it asks to select a mirror, type old-releases.ubuntu.com. The load-bearing question, humorously, has the text “You should never see this question.” Select warty at its prompt.
Partitioning
Be extra careful to partition the device you’re expecting during that step of the installation. It has no qualms about wiping your installation media.
Phew!
The rest of the installation should progress normally. If you’ve installed Debian in the last 20 years or used the netboot Ubuntu images before 22.04, you know how it works. If not, read through the installation’s messages carefully and decide what to do.
You’ve got a long wait ahead of you: after the computer reboots it will need to install a lot of packages.
First boot
The first time I tried this, the computer booted and allowed me to log in to a desktop. The second install, I got an error starting Nautilus and the entire desktop failed. I updated the system by opening a TTY, then replacing archive.ubuntu.com and security.ubuntu.com in /etc/apt/sources.list with old-releases.ubuntu.com. Then I could type the usual sudo apt-get update followed by sudo apt-get dist-upgrade.
As mentioned earlier, my CompactFlash card failed soon after my experiment. That was probably the cause of this strange behavior. You probably won’t see this.
Enjoy
Congratulations, you’ve now installed 20-year-old software on a 24-year-old computer. What are you going to do with it?
I probably wouldn’t have had so much trouble if I had just burned a CD. Also, it’s probably possible to get the installer USB to use the packages contained on itself like it’s designed to do. I just didn’t figure out how to do that and it turned out to be easier to just do a hacky netinstall… I even got into the weeds of using debconf to try and force a suite on the installation. It rudely cleared my setting every time. If you figure out a better way to do this, definitely let me know. I’ll add it to this post, crediting you (or link to a post on your site if you prefer). Do let me know whether you’re okay with that, and whether you’re okay with the license of the content on this site also applying to your work.
Footnotes
- According the U.S. Bureau of Labor Statistics, retrieved from https://www.bls.gov/data/inflation_calculator.htm
- The PowerPC ISO is downloadable from https://old-releases.ubuntu.com/releases/4.10/, alternate mirror at https://archive.org/details/ubuntu-4.10-warty-powerpc. Both of these files were the same on February 24, 2024. SHA256 checksum
8360af2d63c6bbb3adfa7aac612a40df56442e584009746cffb788c30cecce5a, MD5 checksum6ef6fe1a63831c0c92db9a89869a33ea(matching Ubuntu’s old MD5SUMS file) - All shell transcripts from the Mac were manually typed by me. If there are any mistakes, sorry!
- Originally, I tried to get a newer version of yaboot, too, but it wasn’t required. I found that Ubuntu 14.04’s PowerPC netboot images had a much newer version of yaboot that was usable in this situation. To get a copy, you can download mini.iso from the ports.ubuntu.com server (archive.org mirror). You can extract this much like you extracted the warty ISO, copy over the
/install/yabootfile to your ISO root directory, edit the md5 checksum for/install/yaboot, rebuild the ISO, and you’re good to go. - Adding
-hfs-bless extracted/installto thegenisoimagecommand should make the\\directory specifier work, but it doesn’t seem to. Maybe something at Repack Bootable ISO on the Debian Wiki could help?
This post was edited on March 29, 2024 to fix a typo in the age of the Mac and add the link to LAD 66.